How to Import Students in UDISE Plus 2026-27 — Drop Box Method, File Format & Every Error Fixed
📋 Table of Contents (click to collapse)
- Why Use Import Instead of Manual Student Entry
- What Is the Drop Box in UDISE Plus and How It Works
- Step 1 — Download the Official Import Template from SDMS
- Step 2 — How to Fill the Import Template Correctly (Column by Column)
- Step 3 — Upload the File via Drop Box
- Age Matrix Error During Student Import — What It Is and How to Fix It
- Other Common Import Errors and Their Exact Fixes
- What to Do When Import Partially Succeeds
- Frequently Asked Questions (FAQs)
Why Use Import Instead of Manual Student Entry
Adding students one by one in UDISE Plus SDMS is the right approach when you have a handful of new admissions — but it becomes impractical when you need to enter 200 or 300 students at the start of the academic year. The Import Students feature in UDISE Plus 2026-27 solves this by allowing you to upload an entire class — or an entire school — through a single Excel file. This is the Drop Box method, and when you do it correctly, it takes under five minutes to import what would otherwise take three days of manual entry.
The problem is that most operators who fail at bulk import do not fail because of a data problem — they fail because of a format problem. They modify the template header, save in the wrong file type, enter dates in the wrong format, or skip a mandatory column. The portal accepts the file, shows a success message, and then imports zero records. No clear error. Just "0 students imported."
This guide covers exactly how to import students in UDISE Plus 2026-27 using the Drop Box method — from downloading the right template to fixing the Age Matrix error that blocks most first-time bulk imports.
- What the Drop Box is and how SDMS processes uploaded files
- Where to download the correct import template (not from Google — from SDMS)
- Column-by-column guide to filling the template without errors
- Step-by-step upload process through the Drop Box
- Age Matrix error — what triggers it, class-wise age ranges, and the fix
- All other import errors: column mismatch, duplicate numbers, wrong file type
- What to do when import partially succeeds and some rows are rejected
What Is the Drop Box in UDISE Plus and How It Works
The Drop Box is the bulk upload interface within UDISE Plus SDMS (Student Data Management System). It is not a separate module — it sits inside the Student Module, typically accessible from the school's student management dashboard under a label like "Import Students" or "Bulk Upload".
Here is how the Drop Box works behind the scenes when you upload a file:
- You upload an Excel (.xlsx) file using the Drop Box interface
- SDMS reads the header row of your file to identify which column maps to which student field
- SDMS validates each row: mandatory fields present, data formats correct, no duplicates, age matches class (Age Matrix check)
- The system imports rows that pass all validations as new student records in GP (General Profile) state
- The system skips rows that fail any validation — and generates an error report you can download
- You get a summary: X records imported, Y records failed
The critical point is step 2 — the header row is how SDMS identifies columns. If you rename any column header even slightly, SDMS cannot map that column and either rejects the entire file or imports with blank values in that field. This is why you must use the template that you download directly from SDMS — the column names pre-match SDMS's internal field mapping.
| Factor | Drop Box (Bulk Import) | Manual Entry |
|---|---|---|
| Best for | 10 or more students at once | 1–5 new admissions |
| Time per student | ~10 seconds (after template is ready) | 3–5 minutes per student |
| Aadhaar authentication | Must be done individually after import | Can be done immediately during GP entry |
| Error detection | Error report downloaded after upload | Instant field-level validation on screen |
| Risk of format error | High if template is modified | None — form fields enforce format |
| Recommended when | Start of year bulk enrollment, class promotions | Mid-year single new admission |
Step 1 — Download the Official Import Template from SDMS
You must download the import template for UDISE Plus 2026-27 from inside SDMS — not from any external source. Templates that users share in WhatsApp groups or download from other websites are frequently outdated, missing columns that the portal added in the current year's update, or have slightly different column names that break the import.
Where to find the template inside SDMS:
- Log in to UDISE Plus at udiseplus.gov.in with your school's credentials
- Navigate to the Student Module (SDMS)
- Look for "Import Students" or "Bulk Upload Students" option — usually in the top action bar or under a menu
- On the Import Students page, you will see a link labeled "Download Template" or "Download Sample File"
- Click it — this downloads the current year's official Excel template with all correct column headers
Why you must download fresh each time: UDISE Plus updates the import template when the portal adds new fields mid-year. A template from January 2026 may be missing a column that the portal added in March 2026. If that column is mandatory in the current version, every row in your old-template file will fail. Always download the template on the same day you plan to do the import.
Step 2 — How to Fill the Import Template Correctly (Column by Column)
The import template for UDISE Plus 2026-27 student import contains these major columns. Filling each one correctly determines whether your import succeeds or returns errors.
| Column | What to Enter | Common Mistake |
|---|---|---|
| Student Name | Full name exactly as on Aadhaar card — no abbreviations, no titles | Using "Rajesh K. Sharma" instead of "Rajesh Kumar Sharma" — causes Aadhaar auth failure later |
| Date of Birth | DD/MM/YYYY format only — e.g., 15/08/2018 | Entering MM/DD/YYYY (15/08 vs 08/15) — Age Matrix error triggers for wrong DOB format |
| Gender | Male / Female / Transgender — exactly as listed in the dropdown | Entering "M" or "Boy" instead of "Male" — field validation fails |
| Aadhaar Number | 12-digit Aadhaar number — no spaces, no dashes | Copy-pasting with hidden spaces: "1234 5678 9012" instead of "123456789012" |
| Social Category | SC / ST / OBC / General — one of these exact values | Entering "Gen" or "OBC-A" — only the four standard values are accepted |
| Class | Numeric class: 1, 2, 3 … 12 — not "Class 1" or "I" | Entering "Class 5" or Roman numerals — import fails to map to SDMS class codes |
| Admission Number | Your school's admission register number — must be unique per student | Using the same admission number for two students — duplicate error, both rows rejected |
| Enrollment Type | Fresh Admission / Promoted / Transfer In / Detained | Leaving blank or entering "New" — mandatory field, blank causes row rejection |
| Mother Tongue / Medium | Hindi / English / Urdu / Punjabi — as per school's teaching medium | Entering a regional spelling that does not match SDMS dropdown values |
Three rules you must follow when filling the template:
- Never modify the header row (Row 1). Not the font, not the spelling, not the order of columns. SDMS reads the header row to map columns — any change breaks the mapping.
- Do not add extra columns. Adding a "Notes" or "Serial Number" column confuses SDMS's column parser. Use only the columns provided in the template.
- No merged cells, no colored cells. Excel formatting that goes beyond plain data entry can cause the file parser to misread row boundaries. Keep the file as plain as possible.
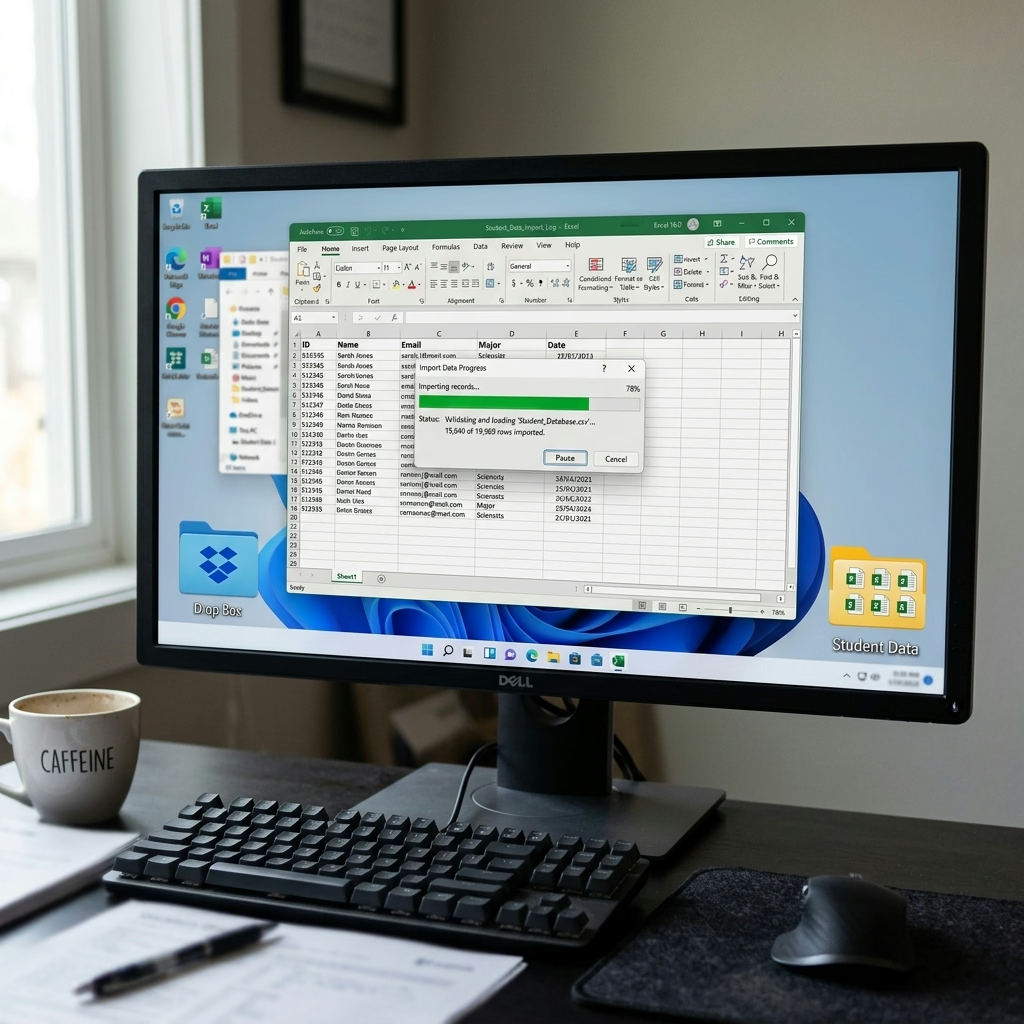
Step 3 — Upload the File via Drop Box
Once you fill the import template and save it as .xlsx, uploading it through the UDISE Plus Drop Box takes less than two minutes for a file with 100–200 students.
| Step | Action | What to Check |
|---|---|---|
| 1 | Go to Import Students page in SDMS | Same page where you downloaded the template |
| 2 | Select the Class from dropdown (if available) | Some SDMS versions require you to select the class before upload; others read the class from the file |
| 3 | Click "Choose File" and select your .xlsx template | Save the file as .xlsx — not .xls, .csv, or .ods |
| 4 | Click "Upload" or "Import" | Do not close the tab or refresh during processing |
| 5 | Wait for the result summary to appear | Summary shows: X records imported, Y records failed |
| 6 | If Y > 0, download the Error Report | The report shows exactly which rows failed and the error reason for each row |
| 7 | Verify student count in class list matches import file | Check 3–4 records individually: name, DOB, category |
Age Matrix Error During Student Import — What It Is and How to Fix It
The Age Matrix error is the most common cause of bulk import row rejections in UDISE Plus 2026-27. It appears in the error report as "Age Matrix Does Not Match" or "Age not valid for selected class." Understanding exactly why it triggers is the only way to fix it without guessing.
What the Age Matrix is: UDISE Plus SDMS maintains a class-wise age range table. Each class has a minimum and maximum accepted age for the student's age as of September 30 of the current academic year. If a student's date of birth places their age outside the accepted range for the class entered in the import file, the portal rejects that row.
Approximate UDISE Plus Age Matrix ranges for 2026-27:
| Class | Minimum Age (as of Sep 30, 2026) | Maximum Age (as of Sep 30, 2026) |
|---|---|---|
| Class 1 | 5 years | 8 years |
| Class 2 | 6 years | 9 years |
| Class 3 | 7 years | 10 years |
| Class 4 | 8 years | 11 years |
| Class 5 | 9 years | 12 years |
| Class 6 | 10 years | 13 years |
| Class 7 | 11 years | 14 years |
| Class 8 | 12 years | 15 years |
| Class 9 | 13 years | 16 years |
| Class 10 | 14 years | 17 years |
| Class 11 | 15 years | 18 years |
| Class 12 | 16 years | 19 years |
Three specific situations cause Age Matrix errors during student import:
1. Entering the date of birth in the wrong format
This is the most common trigger. The template expects DD/MM/YYYY. If you enter 08/15/2018 (US format) instead of 15/08/2018, SDMS reads the month as 15 — which is invalid — and either rejects the row or calculates a wildly wrong age that fails the matrix. Fix: standardize all dates to DD/MM/YYYY before you import the file.
2. Over-age students (common in government schools)
A student who started Class 1 at age 9 due to delayed enrollment will be over-age for their current class by 2–3 years. For example, a 14-year-old in Class 7 falls outside the Class 7 maximum of 14 years (depending on their exact birthdate). You must enter these students manually through the individual student entry in SDMS. The portal provides an override mechanism for over-age students only in the manual entry form, not in the bulk import.
3. Class column value does not match the selected class filter
If the import page has a class dropdown (e.g., "Select Class: 5") and your import file has students from Class 5 and Class 6 mixed, the Class 6 students will fail the Age Matrix check because SDMS calculates their age against the Class 5 matrix, not Class 6. Fix: create one import file per class, or ensure you set the class filter on the import page to "All Classes" if the portal provides that option.
Other Common Import Errors and Their Exact Fixes
Beyond the Age Matrix, UDISE Plus student import via Drop Box returns several other specific errors. Here is what each one means and the exact fix:
| Error Message | Cause | Fix |
|---|---|---|
| "Invalid file format" | You saved the file as .xls, .csv, or .ods instead of .xlsx | Open in Excel → Save As → select "Excel Workbook (.xlsx)" → re-upload |
| "Column header mismatch" | You modified the header row by changing a column name or deleting a column | Download a fresh template from SDMS, copy your data into it, do not touch Row 1 |
| "Duplicate Admission Number" | Two or more rows contain the same Admission Number value | Use Excel's "Remove Duplicates" function on the Admission Number column, or manually assign unique numbers |
| "Aadhaar already linked to another student" | The system already contains this Aadhaar number under a different student record (the old school has not delinked the transfer student) | Search for the student by Aadhaar in SDMS — if you find the student at another school, use the Transfer In process, not a fresh import |
| "Invalid social category" | The category field contains a value that the SDMS dropdown does not accept (e.g., "OBC-A", "Gen", "NT") | Use only: SC, ST, OBC, General — check the SDMS dropdown for the exact accepted values in your state |
| "Mandatory field empty" | One or more rows have blank cells in a required column | Download the error report — it shows which column is blank in which row; fill and re-upload only the failed rows |
| "0 records imported" (no error detail) | You modified the header row, the file has 0 data rows, or you used the wrong template | Re-download the template, copy your data into Row 2 onwards, leave Row 1 untouched, and save the file as .xlsx |
What to Do When Import Partially Succeeds
A partial import — where 80 out of 100 rows succeed and 20 fail — is common on the first bulk import attempt. The UDISE Plus SDMS Drop Box generates an error report for the failed rows. Here is the correct workflow for handling partial imports without creating duplicates:
- Download the error report immediately after the import result screen appears. This report lists each failed row with its error reason. If you navigate away without downloading it, you must redo your analysis manually.
- Do not re-upload the entire original file. The portal has already imported the 80 successful students into SDMS. If you upload the full file again, you will create duplicate records for those 80, which causes "Duplicate Admission Number" errors for all of them — and the 20 genuinely failed rows will still fail for their original reasons.
- Create a new import file with only the failed rows. Copy only the 20 failed student rows into a fresh template download. Fix the errors that the error report identifies (Age Matrix, wrong format, duplicate Aadhaar, etc.) for each row.
- For Age Matrix failures on over-age students — remove those rows from the re-upload file. Add those students manually through individual SDMS entry where the portal makes the over-age override available.
- Upload the corrected file with only the failed students. Verify that the import count matches the number of students you expected to add in this batch.
- After you complete all imports, go to the class-wise student list and do a headcount: the SDMS total per class should match your school admission register per class. Only proceed to EP and SF data entry after you verify this count.
Udise Plus Student (SDMS) Login Module (State Wise)
❓ Frequently Asked Questions (FAQs)
Here are the most common questions people ask about How to Import Students in UDISE Plus 2026-27 — Drop Box Method, File Format & Every Error Fixed.
✅ Conclusion
Importing students in UDISE Plus 2026-27 via the Drop Box method saves hours compared to manual entry — but only if you fill the template correctly from the start. The two mistakes that cause most failures are using an outdated template and ignoring the Age Matrix validation. Download fresh from SDMS each session, validate age vs class before upload, keep admission numbers unique, and never modify the header row. A clean import file processes in under two minutes and requires zero BRC correction. A bad import file wastes a day of re-entry. The format is the process — get the format right first.