UDISE Plus Student Progression & Promotion Activity 2026-27: Step-by-Step Guide with Screenshots

📋 Table of Contents (click to collapse)
- Introduction to UDISE Plus Student Progression 2026-27
- Step 1: Navigating to the UDISE Plus Portal
- Step 2: Choosing the Student Module and Selecting Your State
- Step 3: Logging into the School SDMS Portal
- Step 4: Selecting the Academic Year 2026-27
- Step 5: Accessing the Student Movement & Progression Menu
- Step 6: Opening the Progression Activity Module
- Step 7: Filtering Students by Class and Section
- Step 8: Filling Student Promotion Details (Marks, Attendance, & Schooling Status)
- Step 9: Saving Individual Student Records
- Step 10: Finalizing the Class-Wise Progression
- Step 11: Finalizing School-Level Submission to BRC
- Key Rules and Verification Checklist for Progression
- Frequently Asked Questions (FAQs)
Introduction to UDISE Plus Student Progression 2026-27
Every academic year, the Ministry of Education, Government of India, updates the Unified District Information System for Education Plus (UDISE+) portal. For the academic session 2026-27, the very first activity that every school administrator, principal, or operator must perform is the Student Progression and Promotion Activity. Before you can enter details for new Class 1 admissions, import transfer students, or modify existing General Profile (GP), Enrollment Profile (EP), or Student Facilities (SF) records, the progression of all students active in the previous session (2025-26) must be completed and locked.
The student progression module (within the SDMS portal) ensures that students who passed or repeated their classes in the previous academic session are correctly accounted for. It updates their academic class, section, attendance details, and final exam marks, moving them into the active database for the 2026-27 academic year. If this activity is skipped or done incorrectly, it creates persistent errors, incorrect student enrollment counts, and can lead to BRC verification failures. This guide provides a detailed, step-by-step tutorial with highlighted actual screenshots to help you navigate and finalize this process seamlessly.
Step 1: Navigating to the UDISE Plus Portal
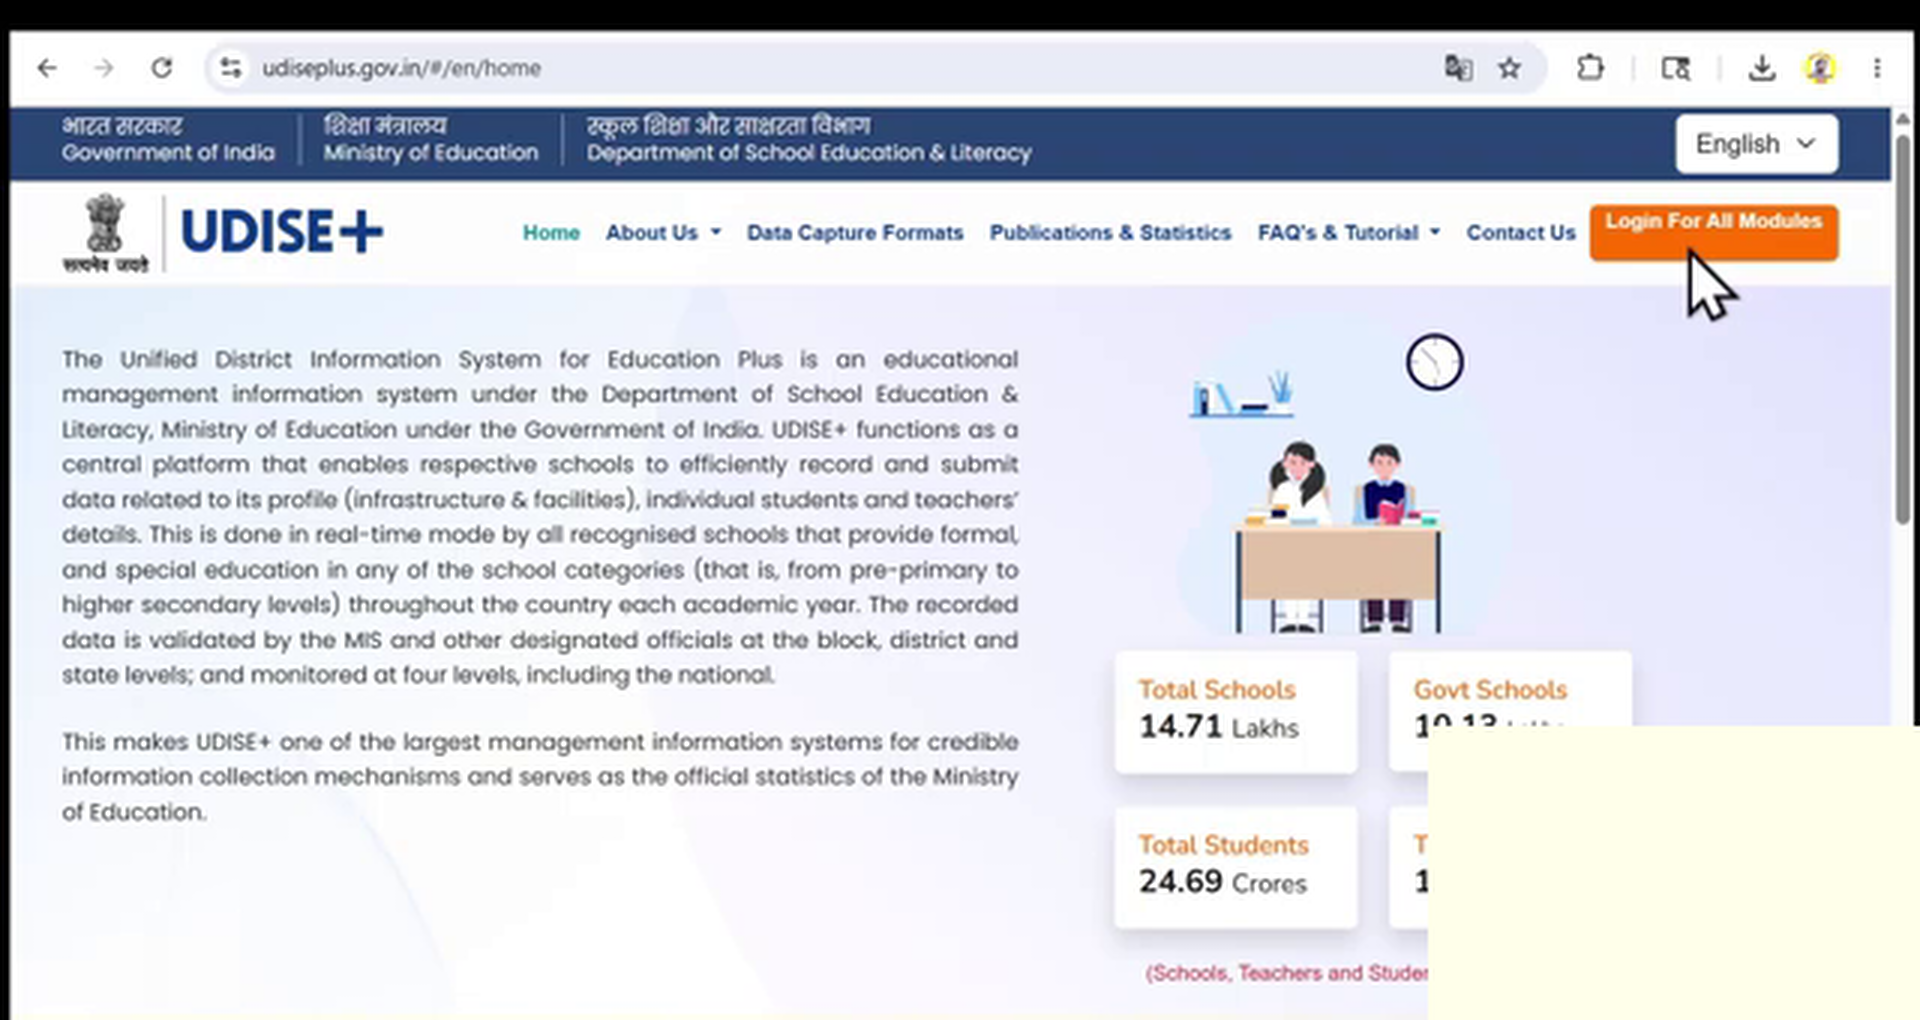
To start the progression activity, open any modern, secure browser (such as Google Chrome, Mozilla Firefox, or Microsoft Edge) on your computer or mobile device. In the address bar, type the official UDISE Plus portal URL: udiseplus.gov.in and press Enter. This will take you to the homepage of the national education database portal.
Once the homepage loads, locate the prominent login option on the right side of the screen. Look for the button labeled "Login For All Modules". This button acts as the central entryway to all sections of the UDISE Plus portal, including school profiles, teacher modules, student directories, and report cards.
Step 2: Choosing the Student Module and Selecting Your State
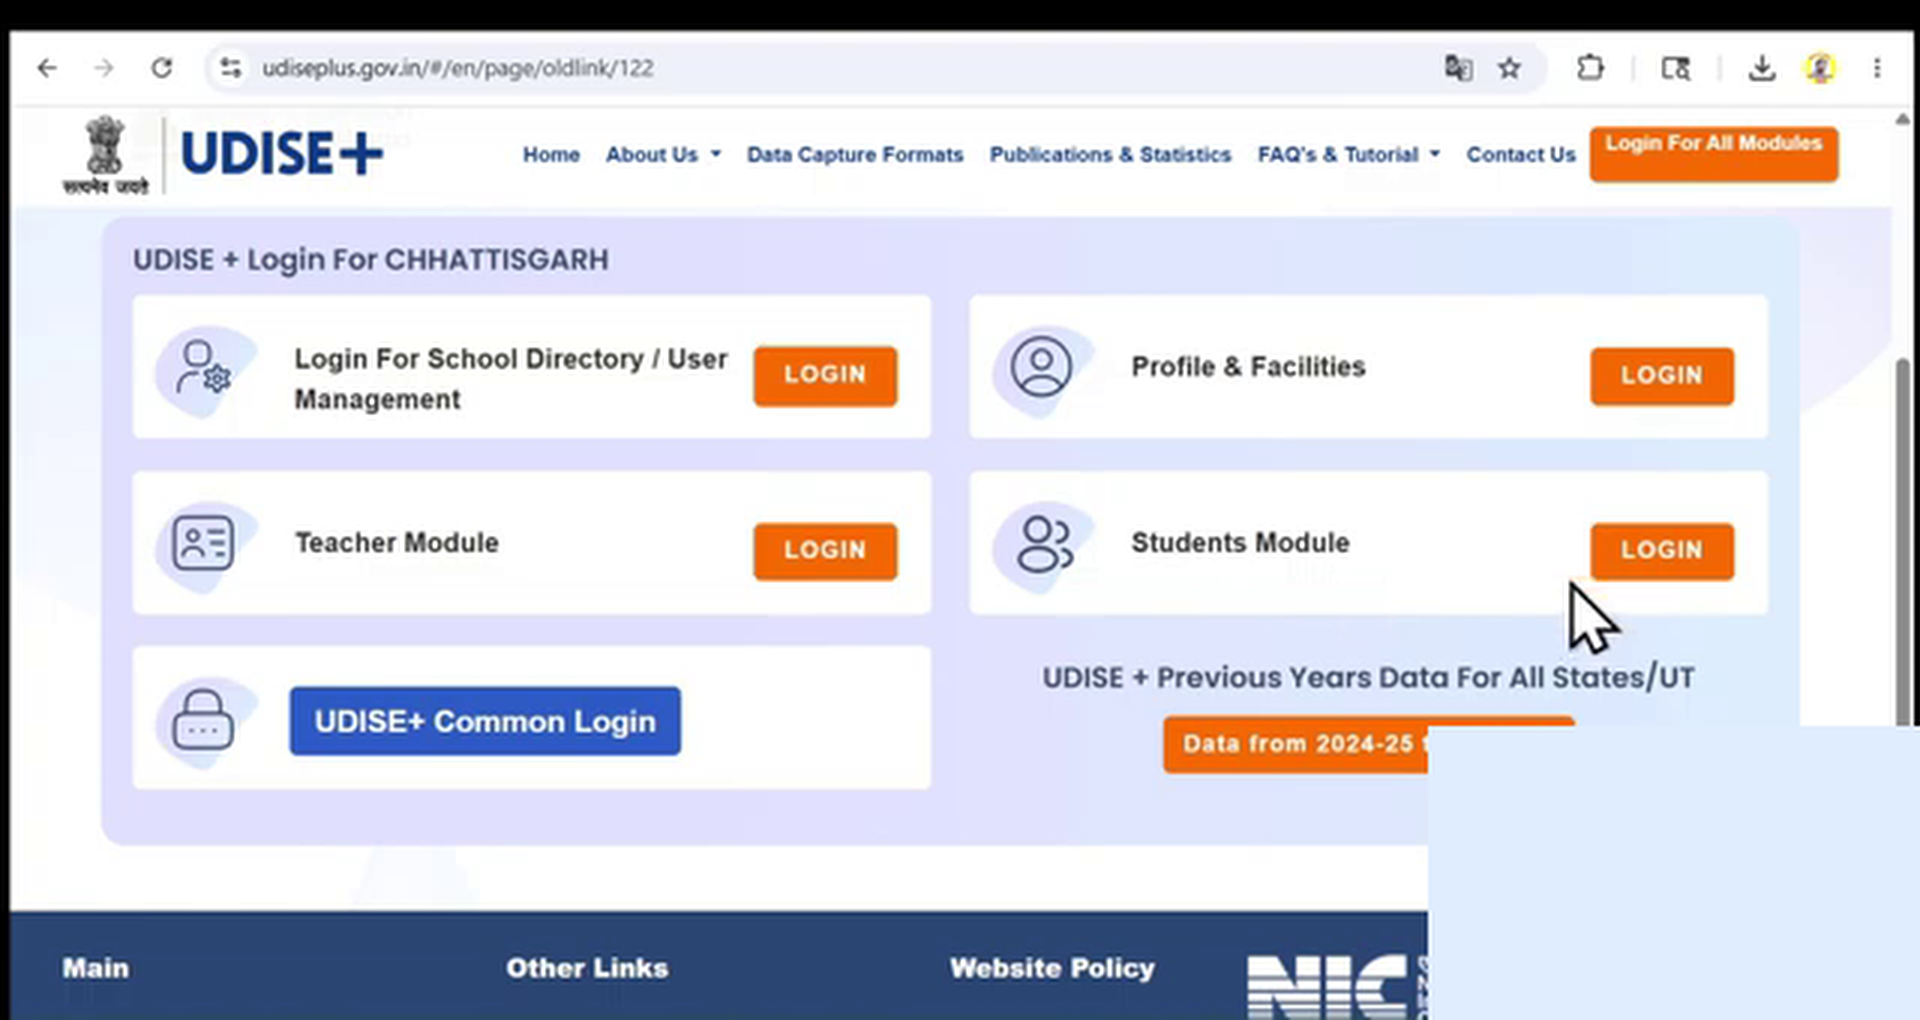
After clicking the central login button, you will be redirected to the module selection dashboard. This page lists various database components such as Profile & Facilities, Teacher Module, and Student Module. To perform class promotions and student progression, scroll down to the section dedicated to the "Student Module".
Because education data is managed state-by-state on different regional servers, you must choose your state from the dropdown list. For example, if your school is located in Chhattisgarh, select "Chhattisgarh" from the list. Once selected, click the corresponding "Go" or "Login" button adjacent to the dropdown. This action routes your browser to the state-specific Student Database Management System (SDMS) login server.
Step 3: Logging into the School SDMS Portal
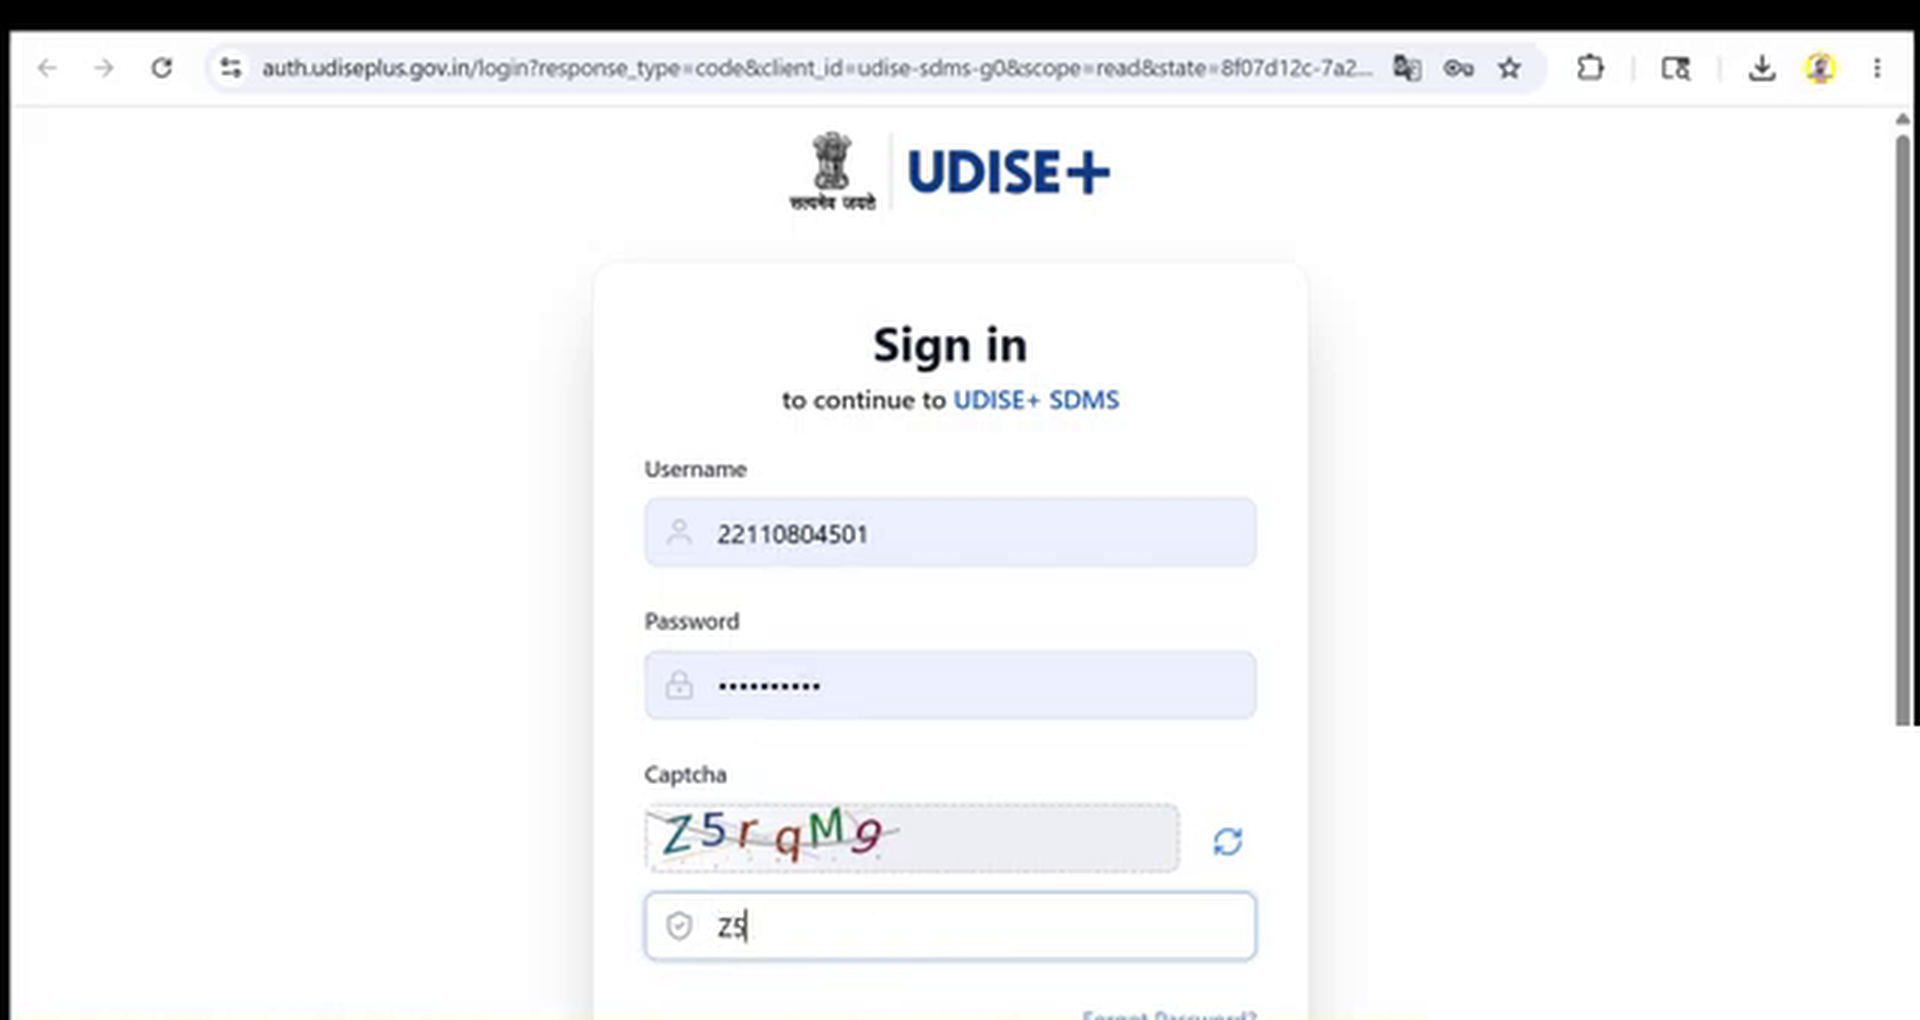
You will now arrive at your state's official UDISE Plus Student Login page. The login panel requires three distinct credentials to authenticate your school's identity and grant administrative access:
- User ID (Username): Enter your school's 11-digit national UDISE Code.
- Password: Enter the unique password assigned to your school. If you have forgotten your credentials, you can use the "Forgot Password" link to recover them via your registered email or mobile number, or contact your Block MIS Coordinator.
- Captcha: Type the alphanumeric characters shown in the captcha image box exactly as they appear (case-sensitive).
Once all details are filled in, click the blue "Sign In" or "Login" button at the bottom of the card to enter your school's database dashboard.
Step 4: Selecting the Academic Year 2026-27
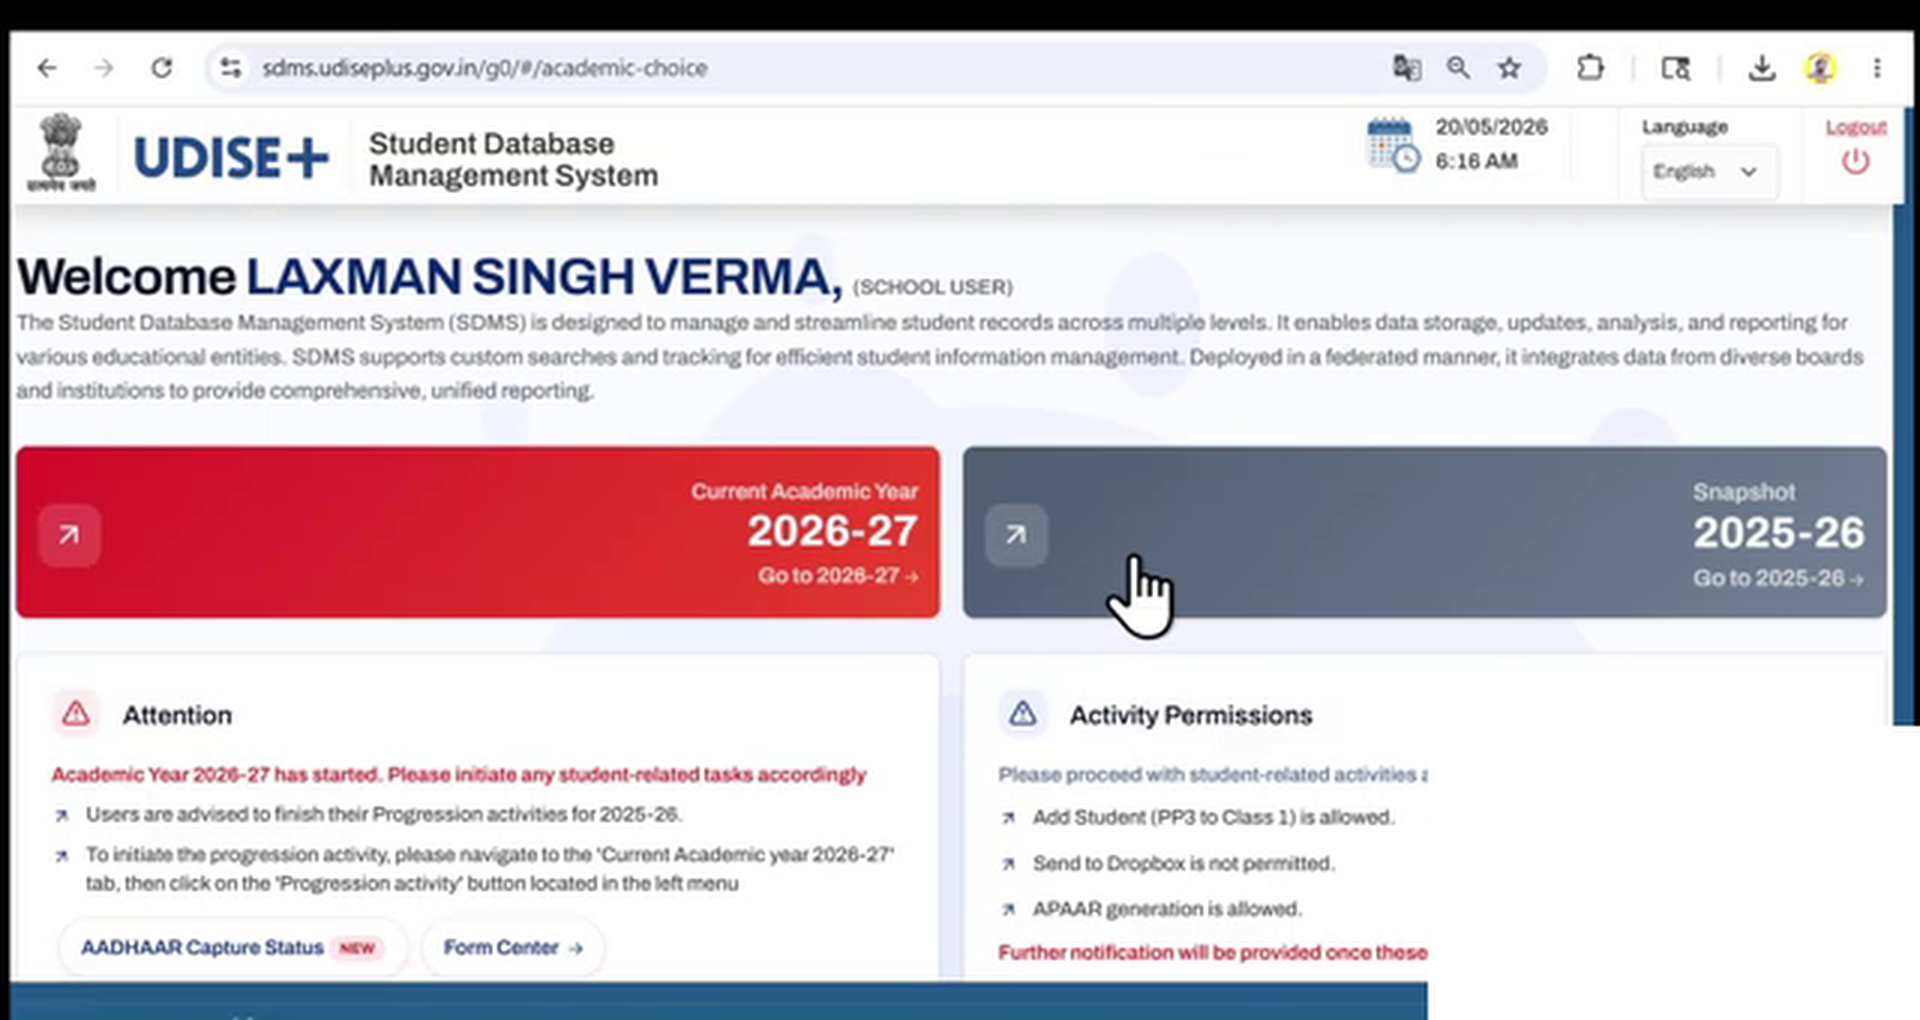
Upon successful authentication, the system opens a landing screen offering access to different academic sessions. You will see two large clickable panels or cards: "Academic Year 2025-26" and "Academic Year 2026-27".
To promote your students for the current session, click on the card labeled "Academic Year 2026-27". Selecting this session ensures that all updates, progressions, and new admissions you enter are recorded for the current school term.
Step 5: Accessing the Student Movement & Progression Menu
After entering the 2026-27 session, the portal will display a popup containing your school's structural details (such as school name, category, lowest/highest class, and school type). Review this information to make sure it is accurate, then close the popup to reveal the main dashboard.
If you are working on a laptop or desktop computer, look at the left sidebar menu. If you are logging in from a mobile browser, click the hamburger icon (three dots/lines in the top-right corner) to open the menu options. From the vertical menu list, locate and click on the option named "Student Movement & Progression". This parent menu item expands to show sub-navigation links.
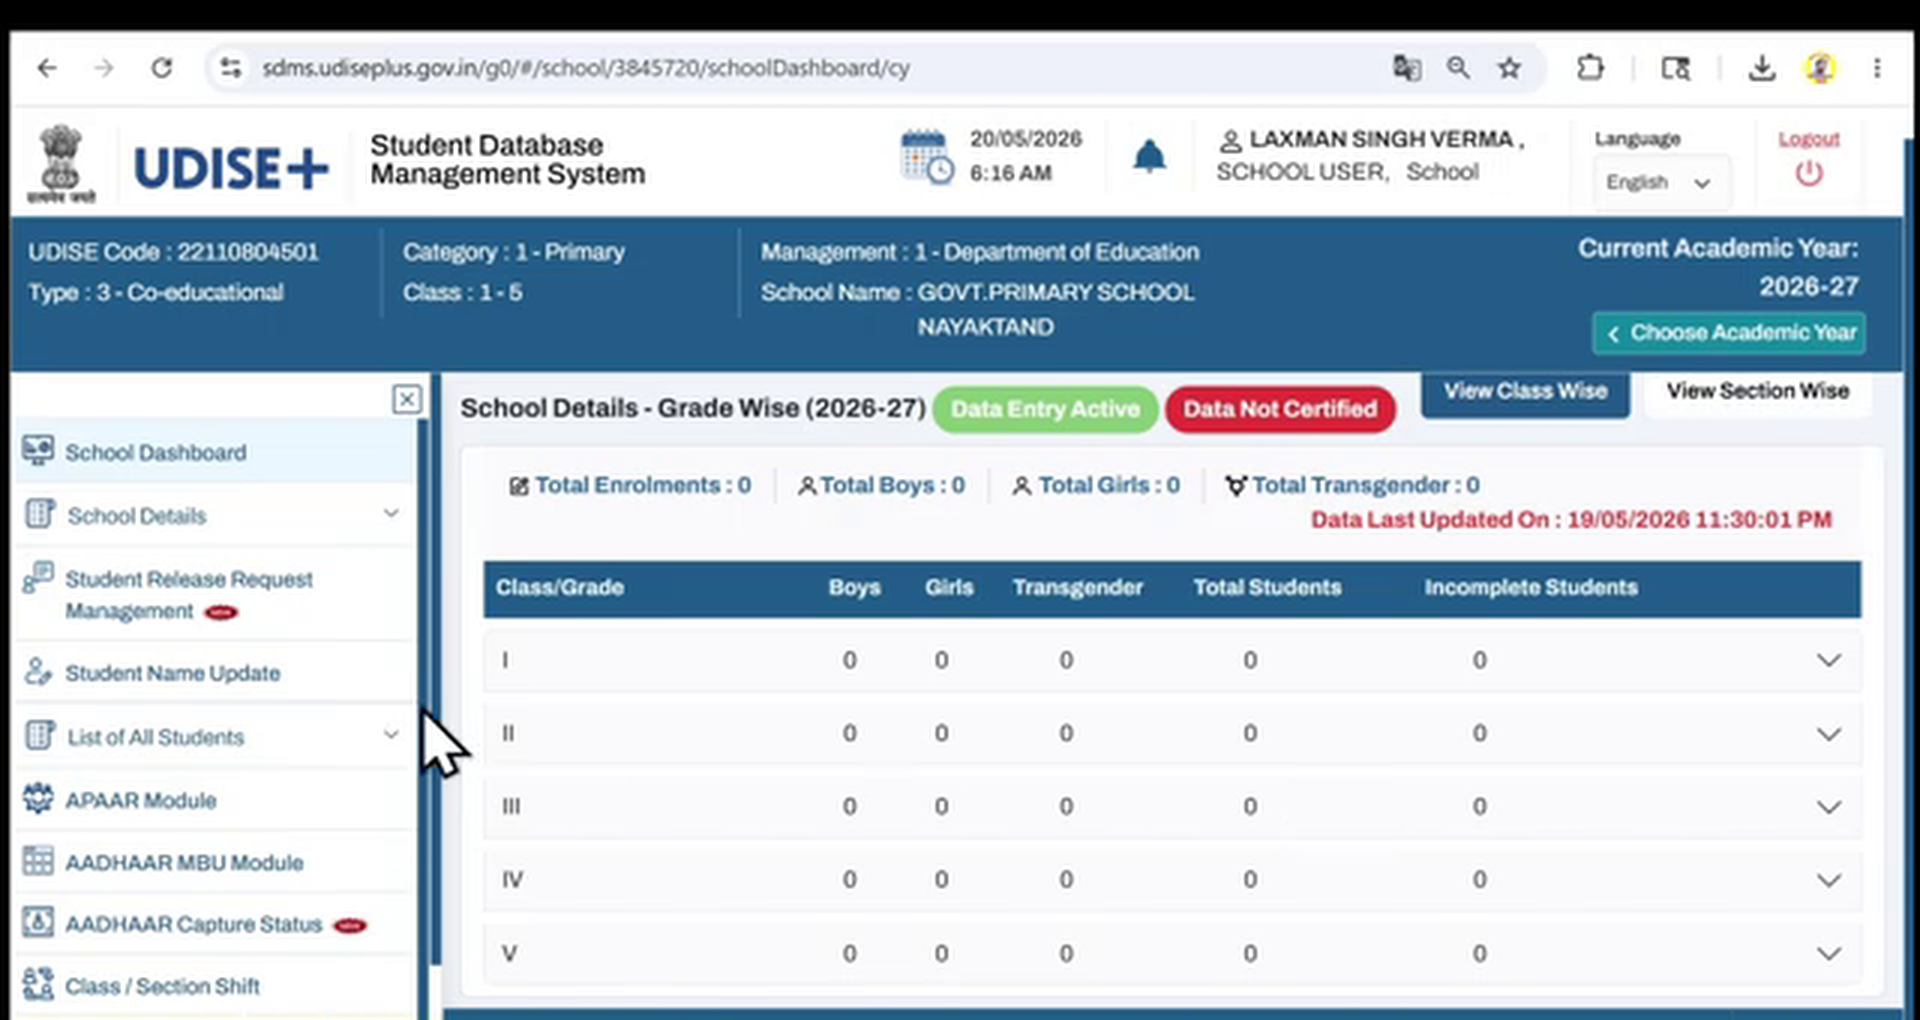
Step 6: Opening the Progression Activity Module
Clicking the parent navigation link expands the submenu. Under it, select the link titled "Progression Activity". This opens a dedicated page containing three distinct options designed to manage student mobility across the national database:
- Progression Module: The main panel where class promotions are executed.
- Import Module: Used to pull students from other schools into your school's registry.
- Dropbox/Transfer Student List: Lists students who have left your school and are waiting to be imported by other schools.
To begin promoting your current students, go to the "Progression Module" box and click the "Go" button located at the bottom of the card.
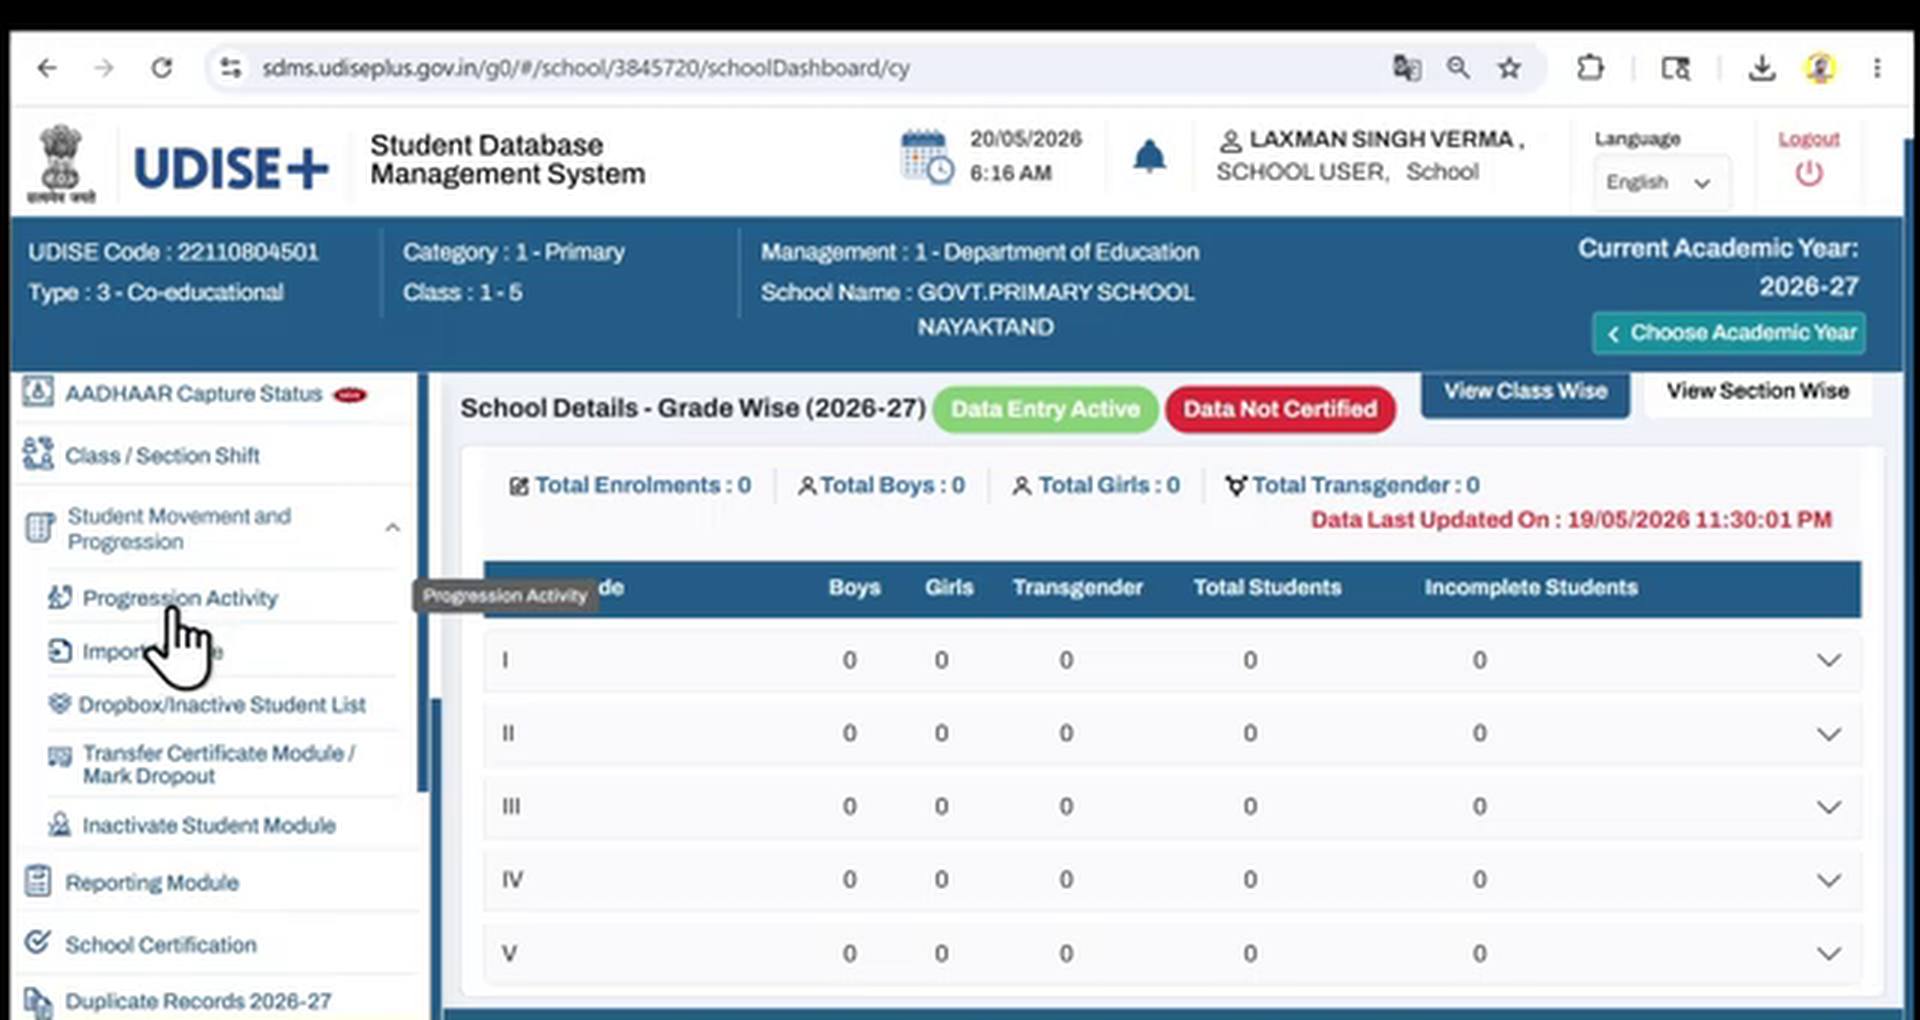
Step 7: Filtering Students by Class and Section
You will be taken to the Class Promotion page. Here, you must load students class-by-class. The page displays dropdown filters for "Select Class" and "Select Section".
Choose the class (for example, Class 1) and its corresponding section (for example, Section A) from the dropdown lists. After making the selection, click the "Go" button. The portal will query the database and load the complete list of students enrolled in that specific class during the previous academic session (2025-26).
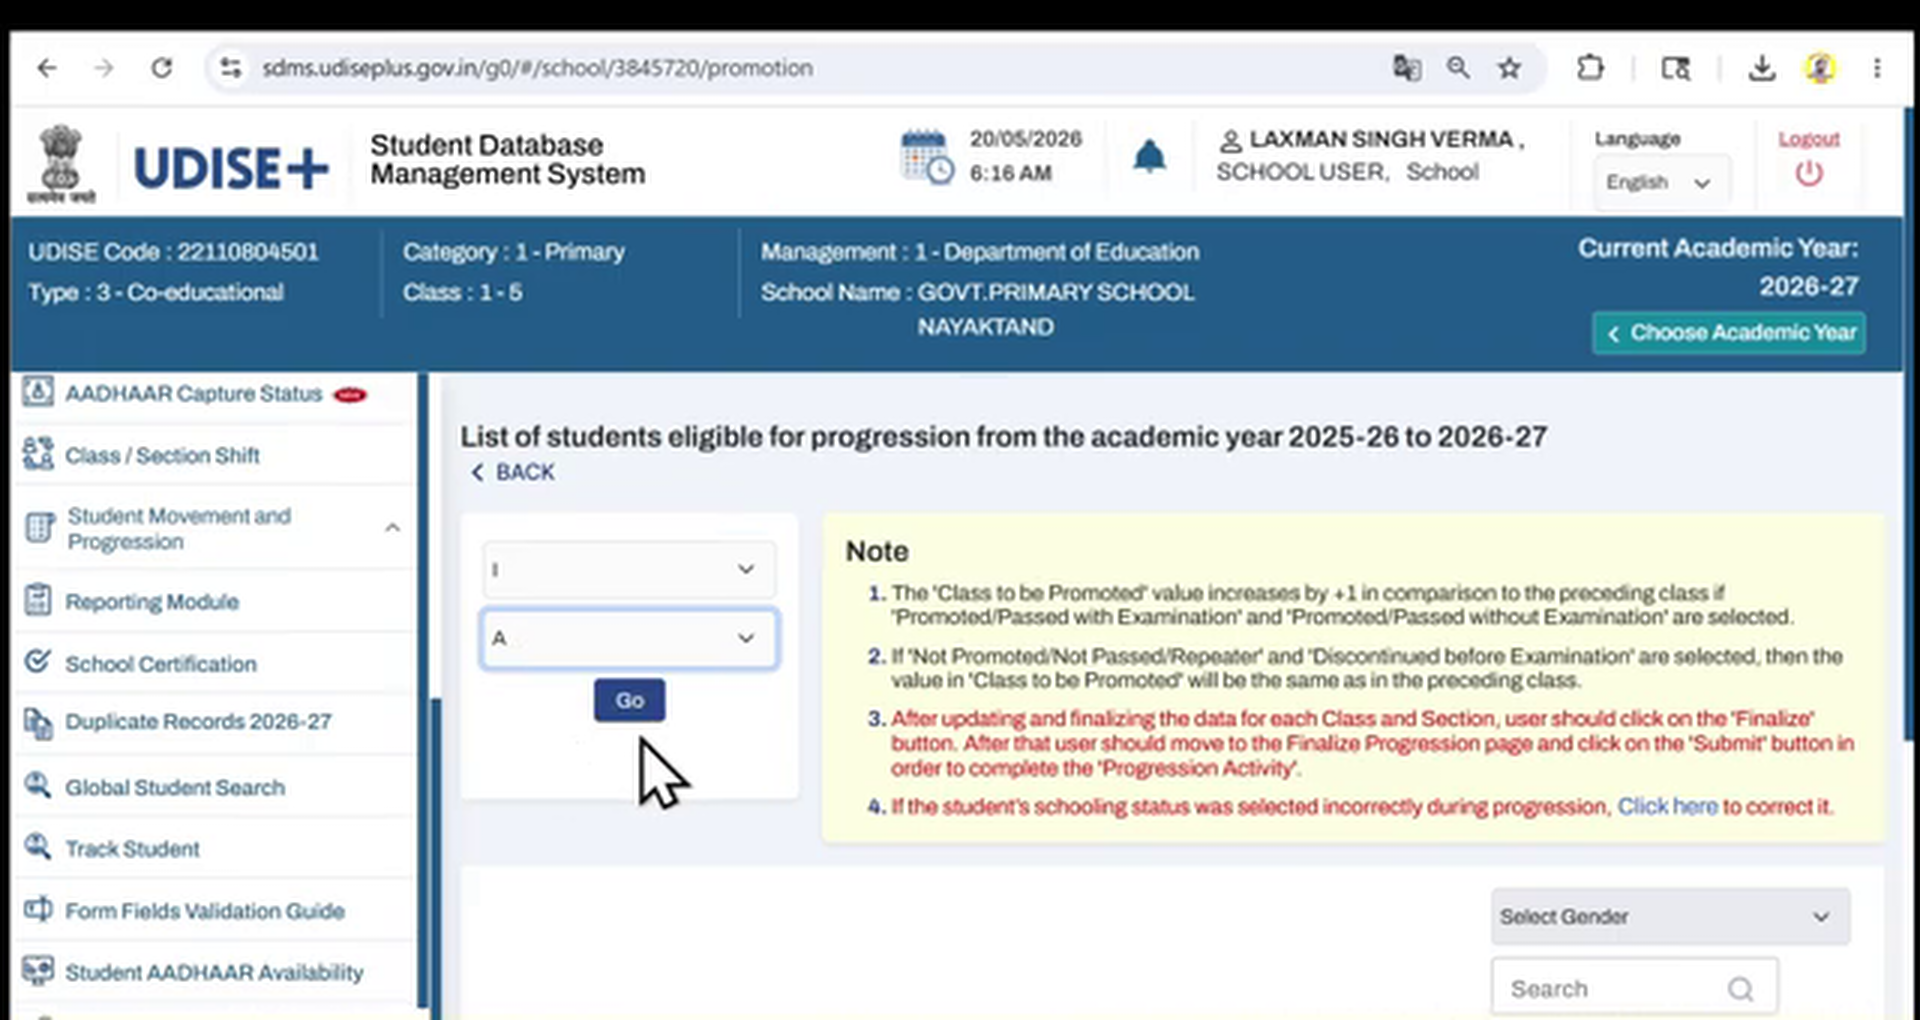
Step 8: Filling Student Promotion Details (Marks, Attendance, & Schooling Status)
The page now displays a structured table listing all students in the selected class. For each student, you must fill in five specific fields in their row:
- Progression Status: Select their academic result. Options include "Promoted" (passed exams), "Not Promoted" (failed/detained), "Promoted without examination", or "Discontinued Before Examination".
- Marks (%): Enter the total percentage of marks obtained by the student in their final exam of the 2025-26 session (e.g., 74%).
- No. of Days Attended School: Enter the total number of days the student physically attended classes during the 2025-26 academic year.
- Schooling Status (2026-27): This is highly important. Select "Studying in Same School" if the student continues to study in your school. Select "Left School with TC/Without TC" if the student has graduated (e.g. completed Class 8 in a primary school) or transferred to another institution.
- Section to be Allocated: Choose the class section they are entering for the 2026-27 session (usually Section A).
After verifying the entered values for a student, click the blue "Update" button at the end of their respective row.
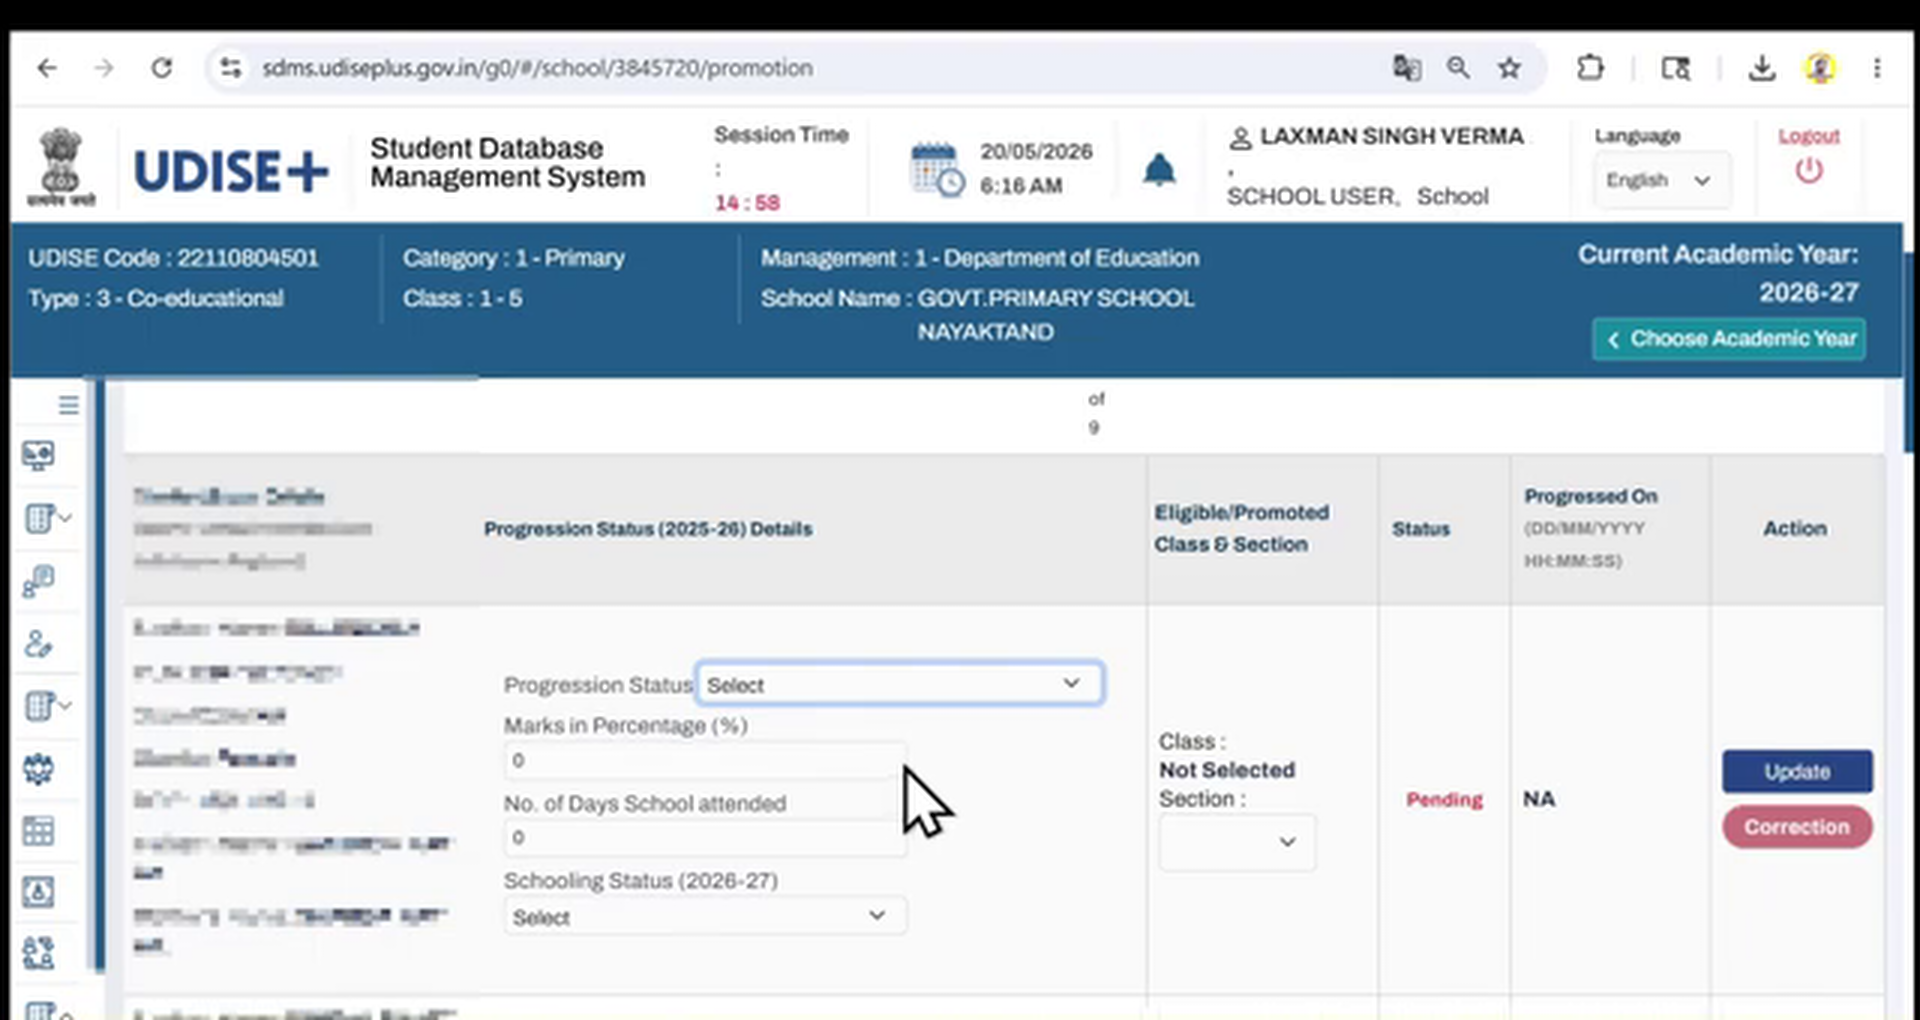
Step 9: Saving Individual Student Records
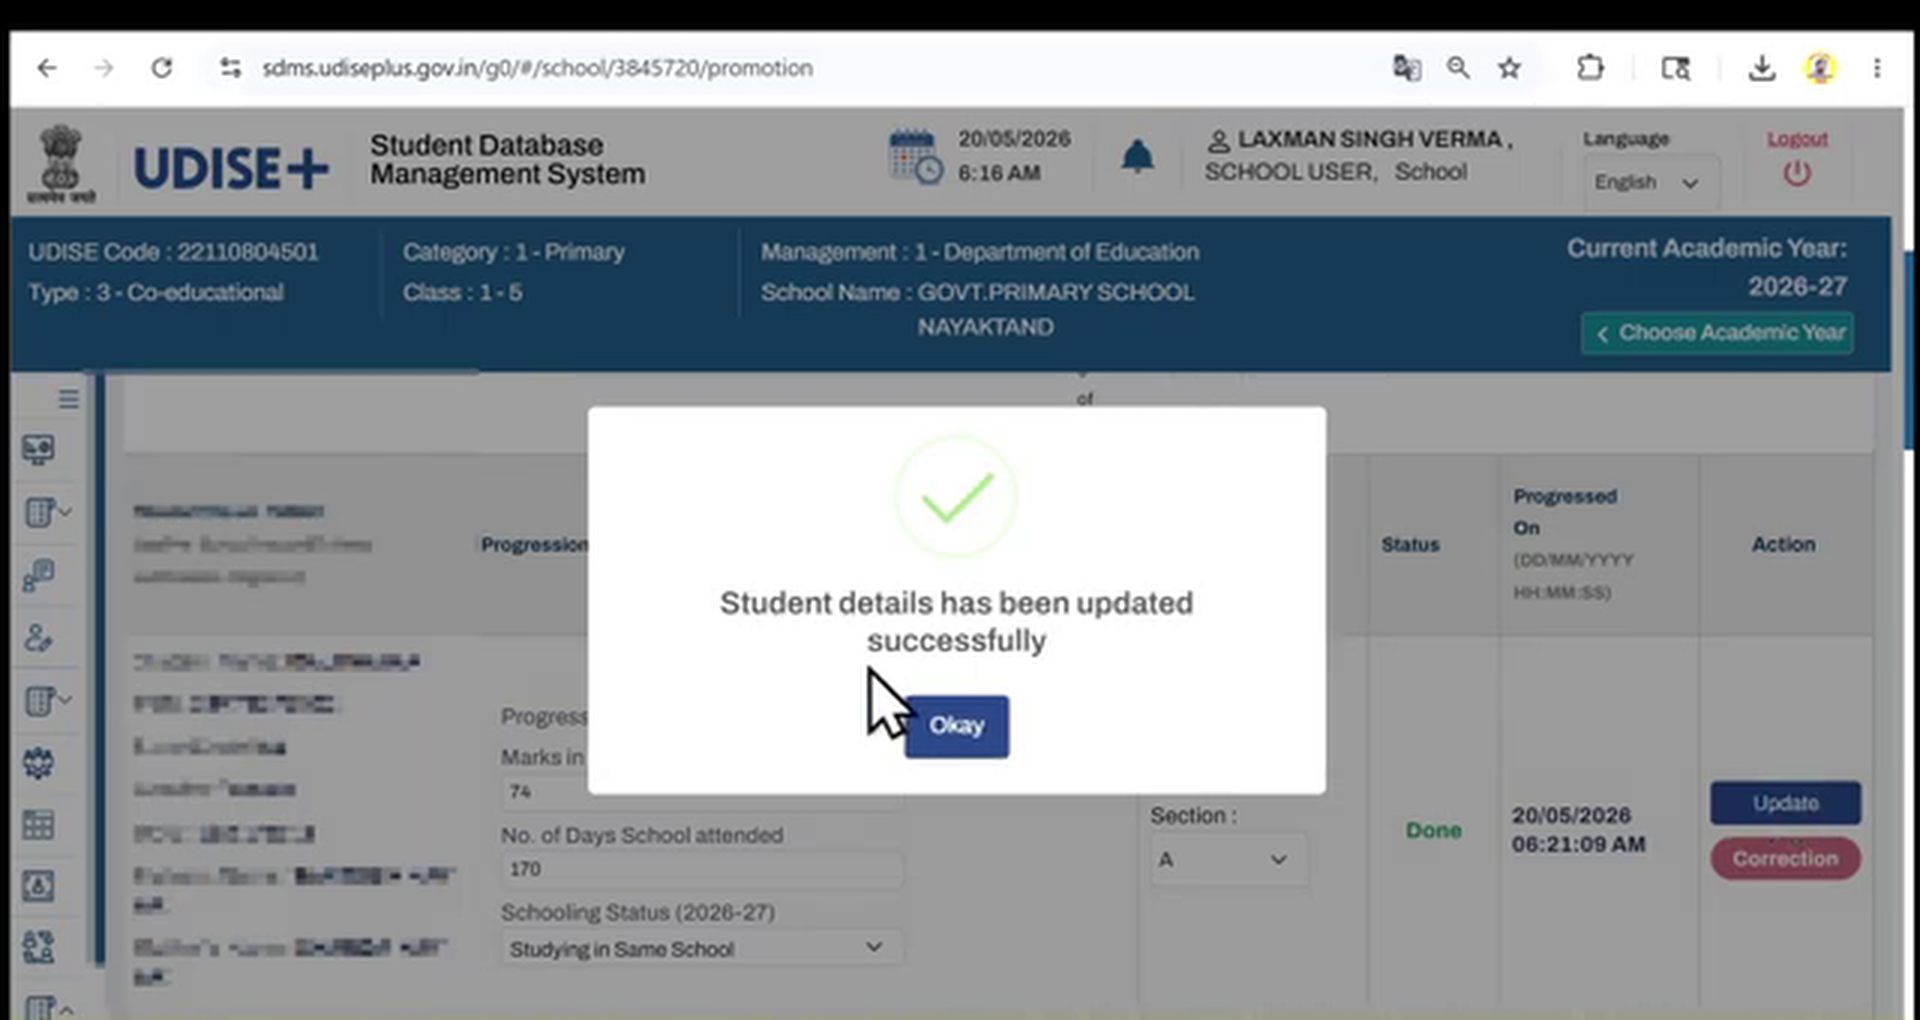
Upon clicking the "Update" button, the system validates the input fields. If all inputs are correct, a success dialog popup will appear over the screen, displaying the message: "Student details has been updated successfully."
Click the "Okay" button in the popup to close it. The status column for that student will instantly change from "Pending" to "Done", indicating that their record has been successfully updated and saved. The system will also display the exact date and time the update was saved.
Step 10: Finalizing the Class-Wise Progression
Repeat the update process for every single student listed in the class table. Make sure no student is left with a "Pending" status. Once all rows display the status "Done", scroll down to the bottom of the page.
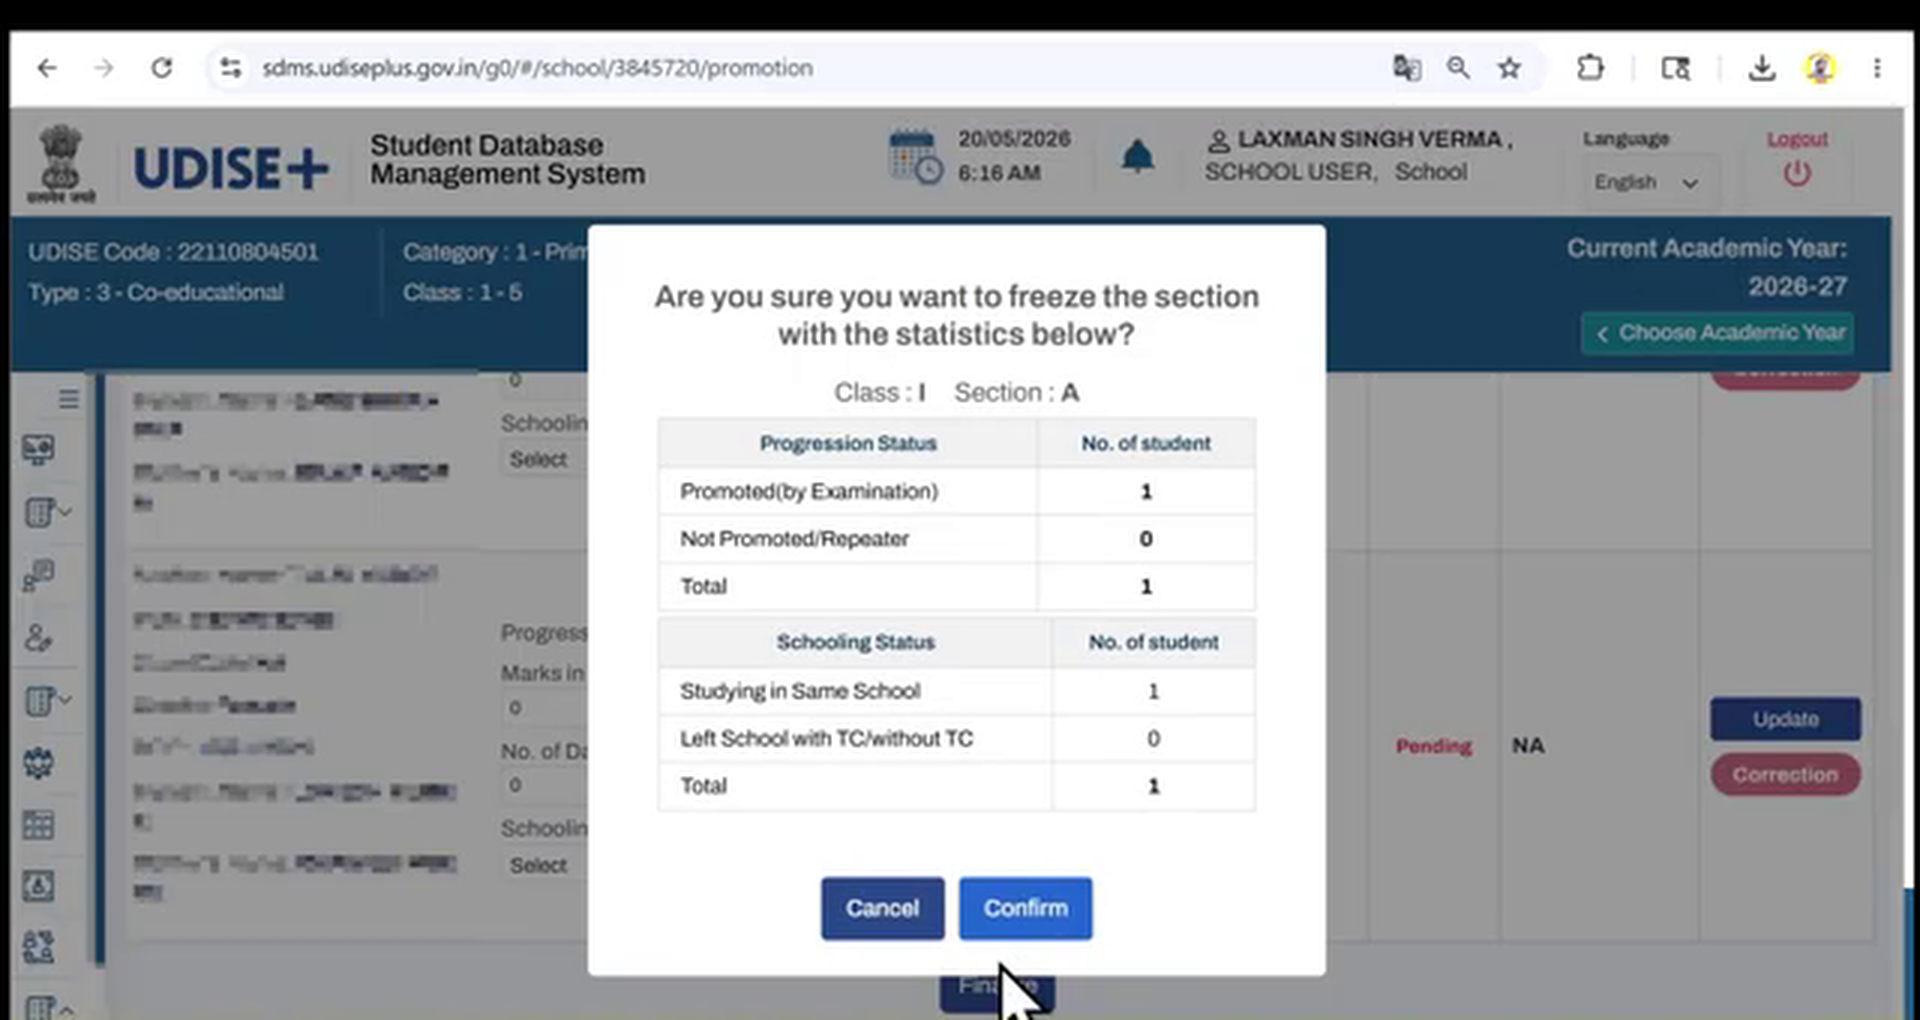
Click the "Finalize" button. A summary dialog box will appear, displaying a breakdown of the class promotions (total students, number of promoted students, number of repeaters, etc.). Double-check this summary against your school register. If correct, click the "Confirm" button to lock the progression records for that class.
Step 11: Finalizing School-Level Submission to BRC
After finalizing the first class, return to the filters, select the next class (e.g., Class 2), and repeat the progression updates. You must complete and finalize the progression for every class in your school (from the lowest to the highest grade).
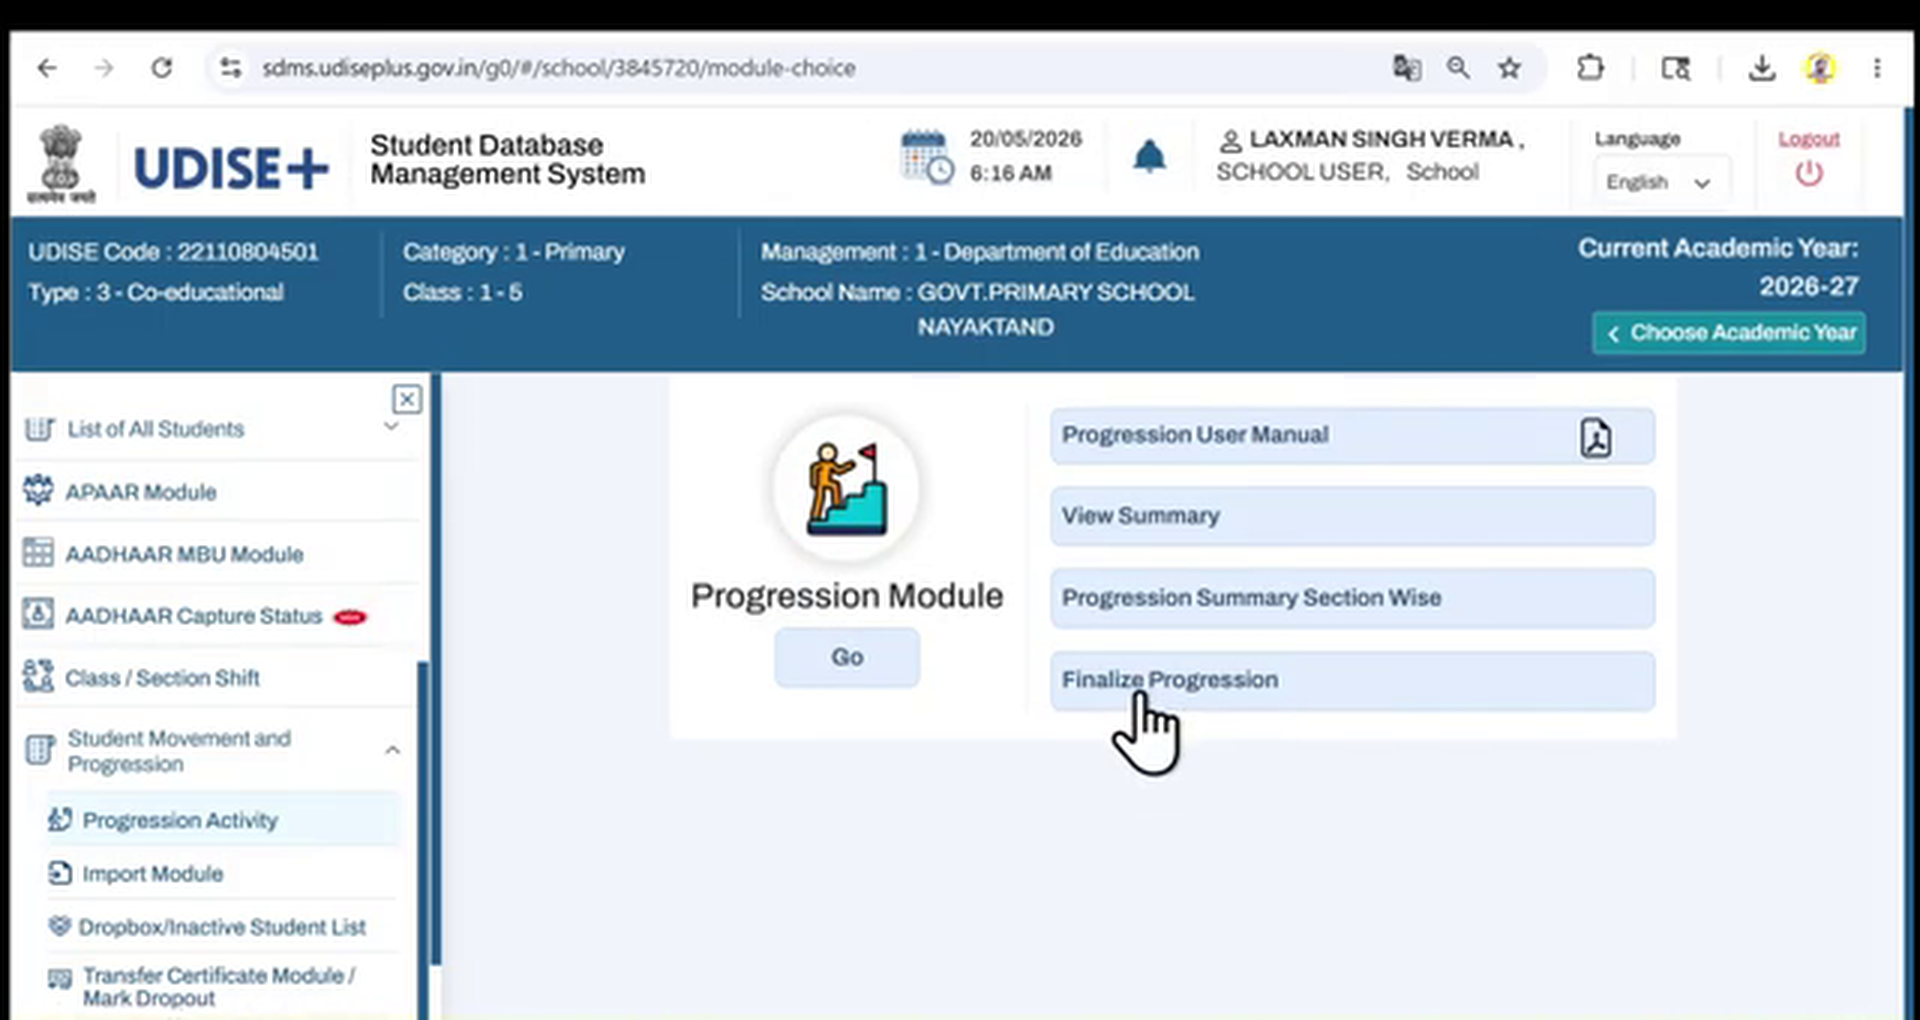
Once all classes have been finalized, navigate back to the main "Progression Activity" menu. Locate the "Finalize Progression" panel under the Progression Module card. Here, the system will verify that all classes are 100% complete. You will see a list of classes and their finalization status. Tick the declaration checkbox acknowledging that all student data is correct and has been verified against school records, and click the "Submit" button. This completes the school-level submission to the Block Resource Centre (BRC) and unlocks the rest of the UDISE Plus Student Module features.
Key Rules and Verification Checklist for Progression
To avoid data inconsistencies and blockages, keep this quick verification checklist handy before clicking the final submit button:
| Student Scenario | Correct Schooling Status Selection | Resulting System Action |
|---|---|---|
| Student continuing in your school | Select "Studying in Same School" | Promotes the student to the next class in your school registry. |
| Student transferred/left school | Select "Left School with TC/Without TC" | Moves the student to the UDISE Dropbox, allowing their next school to import them. |
| Student failed/detained | Select "Not Promoted" (Failed) | Retains the student in their current class for the current academic session. |
| Graduated/Completed school limits | Select "Left School with TC/Without TC" | Marks them as passed out and exits them from your active database. |
Udise Plus Student (SDMS) Login Module (State Wise)
❓ Frequently Asked Questions (FAQs)
Here are the most common questions people ask about UDISE Plus Student Progression & Promotion Activity 2026-27: Step-by-Step Guide with Screenshots.
✅ Conclusion
The UDISE Plus Student Progression and Promotion Activity is the foundational task for the academic year 2026-27. Without completing and finalizing the progression of existing students, you cannot add new admissions, import students from other schools, or proceed with the GP-EP-SF data capture. By following this step-by-step guide and ensuring that dropouts, transfers, and repeating students are marked correctly before running bulk promotion, you can easily avoid BRC rejection and ensure 100% accurate data entry.